Opening Preparation
Mark Dvoretsky and Artur Yusupov
With contributions from:
Sergei Dolmatov
Yuri Razuvaev
Boris Zlotnik
Aleksei Kosikov
Vladimir Vulfson
Translated by Joint Sugden
В. T. Batsford Ltd, London
First published 1994
© Mark Dvoretsky. Artur Yusupov 1994 Reprinted 1994, 1996 ISBN 0 7134 7509 9
British Library Cataloguing-in-Publication Data. A CIP catalogue record for this book is available from the British Library.
Ail rights reserved. No part of this book may be reproduced, by any means, without prior permission of the publisher.
Typeset by John Nunn GM and printed in Great Britain by Redwood Books, Trowbridge, Wilts for the publishers, В. T. Batsford Ltd, 4 Fitzhardinge Street, London W1H0AH
A BATSFORD CHESS BOOK
Editorial Panel: Mark Dvoretsky, John Nunn, Jon Speclman
General Adviser: Raymond Keene OBE
Commissioning Editor: Graham Burgess
White cannot create a passed pawn now, but chronic weaknesses have arisen in the c-filc.
26 #c3 Za8
27 a3 Zc8
28 ФЬ2
Black can do nothing while Uhlmann consistently strengthens his
|
position. | ||
|
28 |
Za8 | |
|
29 |
Zc3 |
Zc8 |
|
30 |
Д13 |
£c8 |
|
31 |
£g2 |
a3S |
|
32 |
ЯС1 | |
The battery along the e-file conforms to the textbook rule: queen behind rook.
|
32 |
£f6 | |
|
33 |
g4 |
£h7 |
|
34 |
ДЬ2 |
Zc8 |
|
35 |
Wc3 |
Wf6 |
|
36 |
Wxf6 |
£xf6 |
|
37 |
g5 |
hg |
|
38 |
fg |
£h7 |
|
39 |
Ze7 |
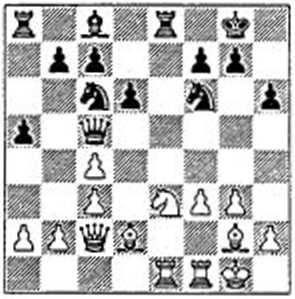
£f8 (21) |
|
:x.a | ||
|
turn |

At this point White could simply have pushed his h-pawn. After 40 h4, the reply 4O...£ig6 41 Exd7 £}xh4+ 42 &g3 £)xf3 43 ФхГС ФГ8 is unsound on account of 44 g6l. Therefore. Black would probably seek counterchanccs with 40...c6 or possibly 40...c5.
Uhlmann finds an excellent combination which exploits his advantage in the quickest way possible.
|
40 |
g6! |
&Xg61? |
|
•40...f6 41 h4. 41 Zxd7 |
£h4+ | |
|
42 |
■i?g3 |
<£xf3 |
|
43 |
ФхГЗ |
Ф» |
Has White perhaps miscalculated? His rook is trapped.
44 h4I!
No, he has not. This modest-looking move is the point of the combination; the h-pawn is going to queen.
44 ... Фе8
45 £xg7 <£xd7
46 h5 Za8
And Black resigned without waiting for the reply.
Now let us suppose you are thinking of playing this variation with Black. You already know about the Uhlmann game, and understand what a threat the white bishop pair can be. Naturally you have no intention of succumbing ignominiously like Osmanagid. So what should you do? Switch to a different variation? Well, if you take that attitude, you will not accumulate any openings at all - for some kind of problem will arise in all of them. No, let us think up something here - surely White doesn’t simply obtain the advantage by force.
Once you have clearly recognised the danger, you can feel your way into the position, absorb its essential nature, and finally discover an idea that will help you in the fight.
L'hlmann-Popov Berlin 1979 (from Diagram 19)
12 Ad2 w'e7
13 f4 ef
14 ef
It looks as if nothing can stop White from implementing his plan. It unfolds in a perfectly natural manner: Лае I, f4, and at some point £d5.
14 ... We5!
15 Sacl WcS (22)
22 w
queen is actually controlling d5, so that it is not at all simple for White to get his knight there. If he plays f4, Black may be able to exchange knights with ...&g4, when £k!5 will fait to ...^f2+.
16 ФЫ £d7
17 b3 Se7
18 Wd3 Sae8
To prepare £id5. White has had to place his queen on d3, where it is exposed to ...?k5. Black has had time to double his rooks. 19 f4 can be met by cither ...€ig4 or ...1Sc4.